Monday, January 31, 2011

Great whipstitch video

Check out this great video on Whipstitching.

When hand stitching I've always have the tail of my thread on the out side of the project so when I saw this video and saw that the beginning tail and end thread tail were hidden inside of the pillow/project I was in awe.

I'm in the learning phase of soo many sewing related things.  Even though I've sewn on and off for years;  It's one of those things that you teach yourself and you do it the way you've always done it, but then you see someone else's tip or trick and you're like...like I said in awe.

It's a nice little video to view.  Check it out.
Read more »

Saturday, January 29, 2011

Goodie Bags

Between my daughter and son they have had, collectively, a total of 18 birthdays, which translates to 18 parties (OMG that's a lot!).

Early on I always wanted goodie bags that were jam packed with little toys.   Of course as the years go by and other birthday parties are attended you come to see that the "goodie" toys just end up all over the place unused.  I don't know when I started but at one point I cut back on the toy portion of the goodie bag and focused more on snacks, like cookies, crackers, a few pieces of candy and in this case a glow stick, small bottle of bubbles and mini deck of cards. 

When thinking about assembling the goodie bags I thought about the usual plastic or paper bags, but instead I opted to make draw string goodie bags, as part of the treat.  Who knows, maybe the kids will keep the bags and use them to hold other little treasures they have.

It was a fun project to work on.  We used material I already had in my stash, and me and my daughter assembled 10 in about an hour and a half.  Afterward she was exhausted (I don't know why??). 

This may be my go to idea for other things as well, like gift bags.  I'm not a "Hallmark" card buyer type of person, I'd rather spend the couple of dollars on something else useful or edible so this might be a good idea for gift cards. Throw a gift card in a draw string bag with a bit of candy or other treat (bought with the money you would have spent on a Hallmark card) and voila a cute little gift.
Read more »

Feather pen

One of my all-time favorite movies is Amadeus.  I LOVE IT!!! 

So when I saw Prudent Baby's feather pen that was the first thing I thought of....Wolfie in Amadeus.  I pictured him sitting at his pool table working on his composition, using a feather pen.  Oh how... peaceful and elegant looking they are.  Sigh.

This project wasn't on my to do list but while roaming Hobby Lobby the other day I see large feathers on sale in the floral department, half off.  "Oooh!  Let me go check them out." 


Words from another favorite movie.
(I know kinda hard to read)

The color I really wanted was black, but they were puny or messed up, so I went with the next color on my list, red.  As if you can't tell by the color scheme of my blog and projects thus far I like black and red.  This is the color scheme in my bedroom. 

I don't know if this would be considered a "project" since it was so quick to put together, however, I had to use it as intended and write with it.  This did take some time to get use to.  You have to hold the pen just right so that the ink flows and touches the paper, and there is a scratching feel/sound as you write that is a little odd, but aww there is such a magical sense to it just seeing it and using it. 

I wish I had handwriting like way back when.
Read more »

Saturday, January 22, 2011

Foldy coin purse

So there was this coin purse I saw online the other day, mentioned in a blog on Sew, Mama, Sew! It was  made  from a Japanese craft kit.  The second I saw this coin purse I yelled in my head "This is what I've been looking for!!".  Seriously I have spent a lot of time looking for a foldy little coin purse like this, but have not found anything even close to it.  I was about to ask the blogger to mail me a kit (I'd pay her of course), but I didn't want to wait.  Of course I started looking online, again, to see if I could find a pattern similar, but got quickly frustrated.  

What to do now?  I'm make it!  I'll wing it.  So I start folding paper into little boxes.  The top overlaps the the bottom.  The two sides need to match the front.  The first paper box was much too big (unless I was making a coin purse for Plinko chips).  The second paper purse...eh still a bit too big.  The third one just right, and still big enough to even hold my credit card... perfect!

OK it's perfect but I need to add a seam allowance; a 1/4" should do.  So I proceed in drawing the pattern 1/4" bigger.  Time to cut out two pieces of fabric.  In the blog she did mention a thicker fabric; so I used heavy interfacing for one side (both sides might be a good idea next time).  I sew right sides together with a opening left so that I can turn right side out, press with an iron and sew the opening close. 
Hmmm? Now I have a two sided plus sign.  What am I to do next?  Ok lets just line up the edges together to form the box like I did with the paper and do a really close seam on all edges.  Yea!  It's a box!!

I, as of yet, don't have the little button fastener plier tool thingy. So I'm gonna have to go with another type of button with a loop to hold my purse closed.

Wow!!  This was much easier then I expected.  I'm soo happy that I saw Karen's blog on Sew, Mama, Sew!  Thank you!

Read more »

Vintage Style Apron - My first attempt at sewing an apron

Woohoo!  Got my large project completed.  Yes large.  I know this might be easy peasy stuff compared to some of the intricately detailed quilts and dresses that are made out there in hand-made land, but for me this was a lot.

I was inspired by a few different blogs when I decided I wanted to make a full apron.  First by A.J.A at "Doing What Comes Naturally in Western N.C." when she said "I want to sew what I want to sew, and I want to sew the pretty." That is so true! I want to make the pretty things I see, but a lot of times when it comes down to it I tend to lean towards the more practical route, because the pretty is not always practical. But for me sewing is a hobby. By definition a hobby is "an activity done regularly in one's leisure time for pleasure". Well hello!! My pleasure is to make the pretty... maybe even the impractical. You know how that song goes "If it makes you happy... it can't be that bad" (Unfortunately that's the only part of that song that makes any sense).  So Thank you A.J.A.  you inspired my want to make the pretty("want" is the key word here... I can't guarantee it will always come out pretty).  

Next I ran into Sew Homegrown's blog where Jessica was giving away a pretty apron, which I commented on in hopes of winning (I didn't win..sniff).  However, when I saw how pretty (is it weird to say kinda sexy in a retro way?  Is it old age talking to say an apron is sexy?  I'm only 33.) the apron was I remembered another site, Sew4Home, where I saw a super cute apron pattern.  At that point I knew what I wanted to do... make a pretty apron.  Then the dilemma.  If it's pretty then I wouldn't want to use it while cooking... ha ha who am I kidding; I don't do that much cooking, and then back to the practicality battle in my head.  If I make it would I use it?  You know what?  I'm always putting down my scissors, 3 of them,  and they end up under fabric and paper and I'm always searching for them.  So I could make an apron to wear while sewing; with pockets to place my scissors.  

I know... I know.  There are craft aprons and utility apron patterns out there, but I loved this pattern.  So I was determined to make it regardless on if I won the apron from Sew Homegrown.  Oh now.... my next dilemma, the apron is reversible.  That pretty much means I need to choose fabric colors and patterns for not one apron, but two.  I already had that really cute sewing notions fabric but now to choose something to go on the other side.  Oh my!  That's a lot to think about.  

While thinking on what type of fabric to buy for my new obsession I get an email.  Oh no!  Prudent Baby's sewing machine contest is revealed.  I need to make pot holders!!  (I've never made a pot holder .... nor an apron).  I bee line to Hobby Lobby and buy supplies for pot holders (I'm determine to make several).  Once home I'm looking at my new pot holder fabric and think "Eureka!"  these fabrics coordinate with my apron fabric, kinda.  I can use these to make my apron.  Yea!!!  Which means I then proceeded to procrastinate on making the pot holders, but there is good reason; the pot holders have to be good enough to win. So I need time to think.... brain storm.       

Wow this chair has some wide hips!
I had a fun time making the apron.  I'll admit it did take me several days to work on it, since I didn't want to rush it.  You know... one day cut stuff out, next pin, sew etc.  The bias tape was the energy vampire of it all.  I used bias tape for the first time last month, December, and for this project I actually made my own with the help of the bias tape tutorial from Prudent Baby.  From what I hear, and seen, it's super easy with the Simplicity Bias Tape Machine, but for me I had issues.  I don't know why but the tape didn't fold very well at the joining strips.  I had to hand correct this with a regular iron in order to use this bias tape.  Believe me I would have thrown it away (more out of frustration) if I had found red bias that matched, but I didn't and I was determine to use red.  So definitely at times like these you have to walk away from your project and focus somewhere else... so that you don't throw it away.  That's when I went on to make the pin cushions.

All in all I'm glad I stuck to my guns and proceeded on making my own red bias for the apron.  The stripes with the red are a little more ice cream parlorish then what I envisioned in my head, but then it reminds me of an ice cream parlor my grandma use to take us to forever ago... so that makes me happy.  Even though it's a little loud and/or busy it was something I've never done before and I completed it... so it's all good.


Happy sigh.
Read more »

Tuesday, January 18, 2011

Test pillows & What a difference a stitch makes

This weekend while working on a larger project (coming soon) I also worked on smaller projects for instant gratification (i.e. the Minky eye mask... love it!).  I also messed around with different shaped pin cushions or mini pillows.  

Now thinking about the pin cushions and playing around with the shapes and fabrics of them could be a great way to determine if you want to make a pillow with your final fabric choices.  Nothing's worst then picking out fabrics, make what you want with them, and then not really care for the final outcome (the fabrics didn't look as nice together as you might of thought or the patterns don't work for the pillow...etc).  What a waste of fabric and time.

So why not first make a pin cushion as your test pillow?  At least it is still a pin cushion, and as long as your not a coordinating obsessor in your sewing workspace a pretty or funky pin cushion is nice to have around.  As for a funky, not what you wanted pillow... well do I keep it in the closet or do I break it down and keep it for scraps?

Frankenstitch (aka blanket stitch)

 
These pin cushions were meant to be pin cushions, and I stuffed them with polyfill and lavender (mmm they smell good).  But after my first one I was sad.  It came out cute, but my frankenstitch just drives me crazy.  My go-to hand stitch is the "frankenstitch", aka the blanket stitch (I didn't know this until I Googled it).  The frankenstitch is not the prettiest thing when sealing an opening in a project such as this.  So I had to find some way to make future projects better looking.  


Clean hidden stitch (well it will be hidden next time I try)

I've heard of hidden stitches and blind stitches so I Googled these (I love Goggle).  In my search I found this helpful video showing how to do a hidden stitch.  Of course I had to try it out; therefore whipped up another pin cushion, and voila the hidden stitch is soooo much prettier.  LOOK!  You can see where I went over to the surface of the fabric a few times (after some practice I'll get better), but it's such a clean look.  I didn't create a monster (another frankenstein reference) I created a pretty pillow... well in this case a pin cushion...ok it'll more likely end up being a pillow for one of my daughters stuff animals.

Yea!  Happy dance! (well it's a happy bob/sway I don't move me feet)
Read more »

Saturday, January 15, 2011

Minky Eye Mask

Why did I not know about this stuff before?!  Not eye masks...minky.  Minky is the most super, softest stuff ever! 

For Christmas I made eye masks for my sisters, and since I was using materials I already had I ended up using fleece, which at the time seemed really soft and comfy.

So as I was roaming Hobby Lobby the other day I recognized the fabric from the tutorial I previously used on Prudent Baby (see it here), and oh my god it was the most wonderful feeling fabric I have touched.  Of course that meant I had to buy some. 
How could anyone ever want to go back to regular fleece?  This micro-fiber fleece is going to give me some sweet dreams.  Love it!

The Prudent Baby tutorial is great.  One of the quickest projects to work on.  Perfect for what I do when I'm not sewing.
Read more »

Tuesday, January 11, 2011

Fingerless Arm Warmers/Gloves

sIt's cold outside...so what does that mean?  It's colder inside.  I'm mostly referring to my office.  In the summer I'm ususally cold when the AC is on.  I'll normally sport a light jacket or hoodie during the summer while at work.  So if it's cold at my office in the summer why would I expect it to be any less cold in the winter?   And unfortunately it's colder.  The seemingly easy solution to turn on the heater is not that easy.  The other office that shares the same heating unit is a smaller office and is not at all cold...so that would mean I would roast them in that office while the heat doesn't do much to mine.  Ugh!

I layer up, but those areas that don't get the t-shirt topped with a long sleeve shirt, covered by a hoodie then my coat get cold.  It's the boney bits that get really cold (ankles, knees, wrist & hands).  So I do what I can to stay warm.  I wear leg warmers under my jeans, and I can only sit on my hands to keep them warm during the day for so long.  Regular gloves sadly are not do-able since I do a lot of typing.  So since I decided to bite the bullet and wear a beanie I decided I'll by pass my thoughts of being a dork by wearing fingerless gloves inside. 

I've occasionally seen the fingerless gloves at stores and they are usually knit gloves, which are cute, but knit anything still lets in a breeze unless there is a lining or it's layered.  So I figured I'd go with fleece like my beanie.

It was a very quick project, under 20 min, and cheaper then buying a pair(a lot cheaper if you think about it. Go to the store for a pair of gloves and who knows what else you end up buying).  Check out your fabric stores remnant bin.  I got about 1/3 yd black fleece for under $2 (which I've used to make my beanie and gloves, with fabric to spare).


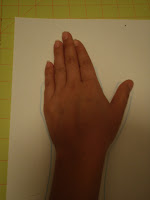
I first started out by outlining my hand.  Then I outlined my outline to create a seam allowance and some room to slip the gloves on and off.  Cut out the pattern, then cut out 4 pieces of felt using the pattern.


Once the pair were pinned together it was time to sew, then turn inside-out and that was it. 


So far I have left the edges unfinished.  I know... they aren't the most stylish things in the world, but you know what? my hands were not freezing today.  Granted my fingers were still a bit cold, but the purpose of the gloves were meet.  A small feat was conquered.  Yea!
Read more »

Sunday, January 9, 2011

Beanie

It's gonna be cold this week so I think I'm gonna bite the bullet and wear a beanie.  I am so not a hat person.  Aside from maybe the occasional head band I don't like things on my head.  No baseball caps, sun visors, no cowboy hats..well their has been the occasional witches hat.  You know how the saying goes, "If the shoe fits...".

So I got a new toy back in October and aside from the beanies I haven't done much else with it.  The serger is one of those things I just had to have, but don't know much about it.  I made my daughter two beanies in November so this beanie project is nothing new. This was one of those projects you look at and say "hey I can do that".  So I used a beanie my son has as a template.

The beanie is made up of 7 pieces of fabric (I used fleece), 6 petal shapes and 1 strip for the rim.  I traced the petal shape from my sons beanie and then just created a larger outline around the shape for a seam allowance. Fleece is very streachy; just make sure you cut it on the streachy side (crosswise grain). 


I cut the rim strip about 2" longer then the length of the base of the 6 petals sewn together.  The rim is 6" wide then folded half.  Since the rim is slightly longer just streach the top portion of the hat while pinning the rim in place.  Sew the rim in place and voila you got a beanie.

Yea I'll have a warm head and ears.
Read more »

Saturday, January 8, 2011

Pleated Tote

Yes!  I didn't let my allergies hold me down today.  I'll admit it was tough, but I made it through the day, and I managed to make a tote (an allergy medicine induced nap was snuck in, but it was much needed).  The tote is super cute; a free pleated tote pattern courtesy of Artsy Crafty Babe, thank you. 

 
There was some minimal issues I came across, on my end.  The pattern and instructions were simple and easy to follow.  Go figure I finally remember to crisply line up my side seams (the interior from the exterior), but then end up not pleating my pleats enough.  Then there were tension issues.  I'm scared of touching the tension dial.  I feel if I leave it alone all will be ok... but that's not always the case since fabric thickness always varies... or what ever other reasons there are that affect the tension.

Just when I thought I was on the last step of the process, finishing off with a top stitch, the bottom thread got all bunched up in several spots.  Of course this was not noticed until I sewed the whole top. Ugh!! So now I have to proceed with the tedious task of getting the seam rippers out and carefully cut out the top stitch.  Let's try this again...top stitch and ... the bottom tread bunches up again.  Ahhhh!!!  This happens right at the side seams and handles (the thicker parts)... and this happens to me quite often.  UGH!  Again the long process of ripping out the thread.  Deep breath..... lets try this again.  Wait!  Let's pull out my sewing guide, that I received from The Stitch Lab, and look at thread tensions.  My tension could be tweaked a bit...maybe...who knows.... but it's worth a try.  It looks like the bottom thread is loose so I tighten it from a 4 to 5.5, and I also increase my stitch length, since this is more of a decorative stitch then a stability stitch.  Third times a charm right?  Sewing....and sewing....slowly sewing...Yea!  it worked! Yes!!  Now who knows what fixed the issue the tension or the length, but who cares the thread did not bunch up again.  Happy dance!

Now the not close enough pleats are gonna drive me mad, but... I guess that means I'll have to make another one.  Sigh!  If... I... have... too.  Haha maybe I'll be brave and use a fun fabric on the outside next time...or another practical color.  Let's see.      
Read more »

Sunday, January 2, 2011

First project of the year

My new year started with a new project from a pattern I purchased from Gingercake.  It's the "On The Go Organizer". My purse is such a mess; I carelessly throw notes and receipts into my purse.  They all get crumpled and torn and my purse starts to look like an office trash bin to the point where I have a hard time finding my keys and phone among the mess.  The trash receptical that was once my purse needs a secretary, but since I can't afford one, and by the time I would explain to the secretary what I want to be done I would have been able to complete the task myself.  So I stepped up to the plate and accepted the challenge (actually I received a discount to the Gingercake website from a monthly newsletter I received from Prudent Baby...I love you Prudent Baby.  This is where I have found alot of my inspiration. So as I glanced through Gingercakes patterns I saw the "On The Go Organizer" pattern and knew I had to have it...later realizing this would be the perfect solution to my purse.)  The pattern and instructions are easy to follow and I have to admit I am quiet pleased with the result even though my edges are not as straight as I would have liked, but I am my own worst critic.  Now all I have to do is take a few minutes to sort through my trash bin...I mean purse and place what is needed into my organizer.  Happy Happy Joy Joy dance!!  Now only if I can find a sewing project that would organize my room.
Read more »